Searching on a table is easier with Dataverse Search in Dynamics 365 CRM
Introduction: In Dynamics 365 CRM, we have different search options to search data. As we have hundreds of records of different table, Relevance Search aka Dataverse Search is a global search box that gets the record information across all the tables. There is a new feature introduced in 2022 release wave one for Dynamics 365 CE on Dataverse search. This feature will help users to search & filter for records in model-driven Power Apps. This will make Dataverse Search easier than before to find the data. Description: What is Dataverse Search? Dataverse Search is a great tool to find quickly records across all the tables. It delivers fast and comprehensive result to all tables, sorted by relevance. In model-driven apps, this Search Box is available in the header in the environment. If we opt into early access of 2021 release wave 2 on a production environment, Dataverse Search is enabled automatically. But if not, we need to enable the Dataverse Search. How to Enable & Configure Dataverse Search: – Before Enabling Dataverse Search: – After enabling Dataverse Search: – Dataverse (Relevance) Search is used by the Dataverse Search Index. You can manage & configure the index from the Overview section of a solution. Under Manage Search Index: – It will show us all the tables which are present in the current solution. When users select the tables for indexing, it will show the number of fields that are included in Dataverse Search. These columns are dependent on the Quick Find View. The limit for Columns indexed in this environment is maximum 950 per organization. Users can enable or disable indexing for a specific table from here and can adjust which columns are included in Dataverse Search within the Power Apps portal. Conclusion: With this new update in 2022 release wave one for Dynamics 365 CE, it is just easy to find the record, it also helps minimize the no. of clicks required to find or to get there. References: – Thank you, Shubham Dhumal for your inputs.
Disable LookUp Hyperlink in D365
Introduction While working with a Read-only grid in Dynamics 365, if a user clicks on the lookup reference it takes you to the lookup reference record, while the intention was to navigate to the actual record. Let’s see how we can disable the link to the lookup reference. Solution As you can see in the screenshot below, we have link references in 4 different fields Name Customer Service Executive Customer Email (Email-link reference) Microsoft has recently released a new feature that allows the user to disable the Lookup reference link. Follow the steps below to disable the lookup reference link: Step 1: Open the solution and navigate to the entity for which you want to disable the link. While editing the solution please use the classic solution editor as all controls are not visible in the Modern UI. Step 2: Click on control section on the entity form and look for “Power Apps Read-only Grid” Step 3: Change the configuration and select the configuration for the (web, Phone, Tablet). In configuration, select the Navigation type allowed and edit it. Step 4: Set the bind to static options to “Primary only” Step 5: Save and publish the solution and refresh the home grid, you will be able to see the new changes. Conclusion This feature will help you avoid clicking on the wrong reference link on record. Thank you, Subhash for your inputs on this blog.
Assignment Rule for Lead and Opportunity Routing
Problem Definition: Unassigned Lead or Opportunity would result in loss of business. Also, inability of a seller to reach out to the customer due to overburden of lead assigned could result in loss. Solution: Assignment Rule for Lead Routing This rule helps to assign new leads and opportunities to sellers and sales team automatically, thereby skipping the human intervention and reducing the effort and time for the assignments of records. Also, it helps in overcoming issues such as loss of lead due to not being assigned to user or team and also helps to reduce the overburden on a particular user or team. Requirements: License: Dynamics 365 Sales Premium or Dynamics 365 Sales Enterprise Security Role: System Administrator, Sequence Manager, Sales Manager. Prerequisite: You need to have enabled Sales Accelerator feature in your organization. Create and activate an assignment rule. Navigate to Sales Insight Settings Area In Global Settings, under Sales accelerator click on Assignment rules. Click on New Rule under Leads -> Select Lead assignment rule as shown below: This will open a quick create form for new rule create form as shown below: Under Rule name provide a specific name to your lead assignment rule. Select eligible leads for this rule: you are provided with two options, either apply the assignment rule to all the leads being created in the system by choosing All Incoming leads or choose Specific leads If you select the Specific leads, then you would be provided with drop down to select Segments. Additionally, rule also allows to have additional conditions using the lead rows and specifying conditions on it or comparing it with specific values. Choose Seller type: This will allow you to choose seller on basis of certain conditions or attributes specified. You can choose options from Any Seller to Specific Sellers or Sellers with matching attributes. Even Teams could be assigned. Distribute leads by: Deals with distribution methods for lead across organisation. This is implemented by 2 methods: Round robin: Leads are distributed on a cyclical basis to sellers who are qualified to receive the lead, based on the conditions of the assignment rule. Load balancing: Leads are distributed among sellers depending on their current workload. This helps ensure that all sellers are equally busy. Manage Lead Capacity for Seller Click on the Manage lead capacity for seller link as shown below in the image to navigate to Team Settings. Team Settings: this list outs the seller/ users and teams present in the organisation. Select one user as shown below. This will enable Set capacity button on the grid. On click of the Set Capacity button, a quick view will open which will ask you to set the capacity of the maximum leads that can be handled by the particular seller. Fill in the values and click save to set the capacity. Monitoring under Assignment Rule Leads or Opportunities that were not assigned even after the assignment rule application, would be listed under Monitoring. You may manually select them to be assigned to a seller. Conclusion: Sales Accelerator feature of Assignment rule for Lead and Opportunity does efficiently enhances the system with reducing the efforts required. Thankyou, Ashitosh for your inputs in this blog.
Join Teams meetings from in-app appointments
Introduction Earlier we used to book an appointment either by using Microsoft Teams or from MS Outlook. But now we can book an appointment from in-app appointments, also we can add links, lists and other rich text in description with new rich text editor control. These features are introduced by Microsoft in Microsoft 2022 release wave 1 plan. Description Go to Activities and click on Appointment Enter Subject as in Topic of the meeting. Enter Email id in Required Field which indicates the email id of required person to join the meeting. Enter optional Email id and Location. Toggle Teams meeting to Yes if you are scheduling an appointment as Teams meeting. Select Company in Regarding field and then Enter Start Time and End Time. Enter details in Description, you can also share any web link with participants Click on Save. Now you can see Teams link for the meeting you scheduled. You can use this link to join the meeting Conclusion By including this feature, you can easily add Microsoft Teams meeting from an appointment in your model-driven app. Also, you can also join a Teams meeting with a single click from the appointment or the timeline control. Sincere Thanks to Surbhi for bringing this topic to light.
Upgrade to Dynamics 365 Project Operations from Dynamics 365 Project Service Automation
Some exciting news for the users who are planning to upgrade from Dynamics 365 Project Service Automation (PSA) to Dynamics 365 Project Operations (PO). Its been a long awaited news Dynamics community and PSA/PO fans are waiting for. Well Microsoft has pulled up the curtain on how the release will happen. First news before we look in to how the upgrade will work is that it will work for Dynamics 365 Project Operations Lite Deployment customers only. It will be released with 2021 release wave 2. The release will happen in 3 stages: Stage 1: December 2021 Microsoft is targeting the customers that do not have any dependencies on WBS Structure or any of the related entities to WBS. Stage 2: In April wave, Microsoft intends to support the customers who have less than 500 tasks in WBS Stage 3: Post April wave, customers who have bigger projects or more than 500 tasks will be taken up. Conclusion: Transformation has begun and is soon going to be available. Customers can slowly start to migrate based on where they actually stand with the project size and needs.
Auto Generate Work Order Option in Field Service
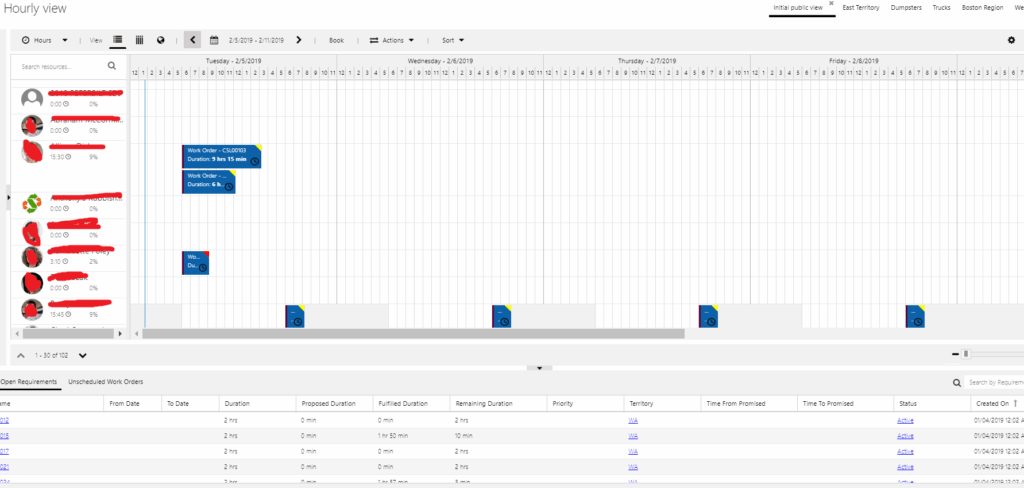
I was preparing for the Pre-Sales demo for a client and came across a situation where the Work Order was not generating automatically, till I realised a couple of settings and the process of how to do it. The following is what happened and how I could actually see my work order getting generated automatically for me and were also scheduled. Post logging in to my instance I went to Field Service–> Service Agreements and clicked on +New to create a New service agreement. The following details were filled in by me: Summary Information: : At this point the System status will be Estimate. Detail Information I moved ahead to create a Booking Setup. This is where I was expecting the work order to get generated automatically. I clicked on + Sign on the Booking Setup grid and tried creating a record and filled in all the required details on the Details section of the Booking Setup form. Following is what made the Work Orders generate Automatically: Mark Auto Generate Work Order field to Yes. Set the Booking Recurrence by clicking on the button on Ribbon control. Go back to the Agreement and mark the Agreement status as Active. Come back to Booking Setup done and you will see that the Booking Dates Grids have the records in it based on the Recurrence schedule selected. Each record is a work order which gets scheduled automatically on the Schedule board. You are done. This blog reflects my personal findings and based solely on my experience of using Field Service.