Setting the WorkHourTemplate in the right way to the resource in PSA
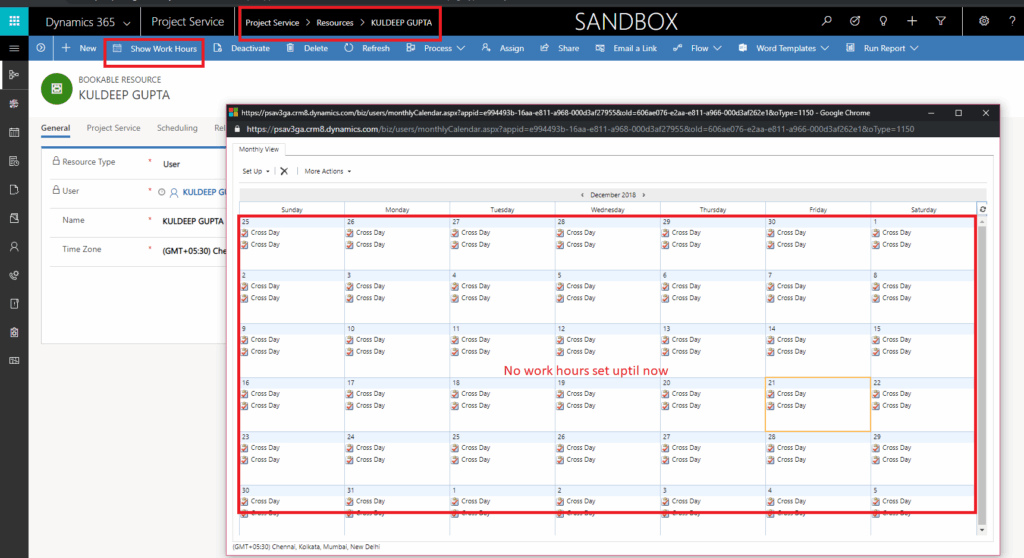
Business Use Case: I was trying to explore the Extend Booking functionality in PSA and saw that the users were getting allocated for the entire 24 hours a day. I immediately figured out that the issue was that the work hour template was not set properly. That doesn’t mean I didn’t have a new work hour template created and assigned to all the resources, but, the only thing missing in that was that, I didn’t set the work hour of the resources to 8 hours. To check the Work Hours of a resource you can Navigate to Project Service –> Resources –> Select a Resource. Click on the button Show work Hours as highlighted in the Screenshot below. A Pop-up opens. The below screen shot shows that the Work hours are not defined for the resource as of now. Hence the resource will be allocated for 24 hours if they are selected for a project unless there working hours are defined. Image1 : Next wrong I did: I selected the resource in the Default Work Hour Template and then created the Work Hours for that resource (8 hours a day and Mon-Fri working). Image 2: Assigned this work hours to all the resources from the below Navigation. Project Service –> Resources Select all resources and click on Set Calendar button from the Ribbon Control. Image 3: Assuming that the new work hours will be set for all the resources selected. I then tried to allocate via extend booking and saw that the resource was still not respecting the new Work Hours set. Upon further research I tried the following that worked out to be the solution and that is how the work hour template of the resources should be defined. I created a new work hours template. In order to do that please navigate to Project Services as shown below in the screenshot. Image 4: Resource selected in this should have the proper work hours defined. To set the work hours refer to the image 2. Select all the resources and assign the newly created Work hour template as shown in image 3. Now while creating the project select this new Work Hour Template created and this will respect the new work hours. You will not be able to change the work hour template for the old projects as the field is locked and you are not allowed to change it amidst the project. I hope this blog post helps you to now create the Work Hour Template in the proper way and assign it correctly to the resources to be respected in the projects. This blog reflects my personal findings and based solely on my experience of using PSA for last 5 years. For those who are looking for a platform that can track and manage the entire procedures of sales and project managements, I would highly recommend them to try Microsoft dynamics 365 for project service automation. According to my opinion, implementation of Microsoft dynamics 365 for project service automation is one of the best things that we did in CloudFronts Technologies. We have gained a lot with this implementation because we save time and money due to easy access resources and ability to manage them.
Extend booking functionality and an alternate to resource booking in PSA V3
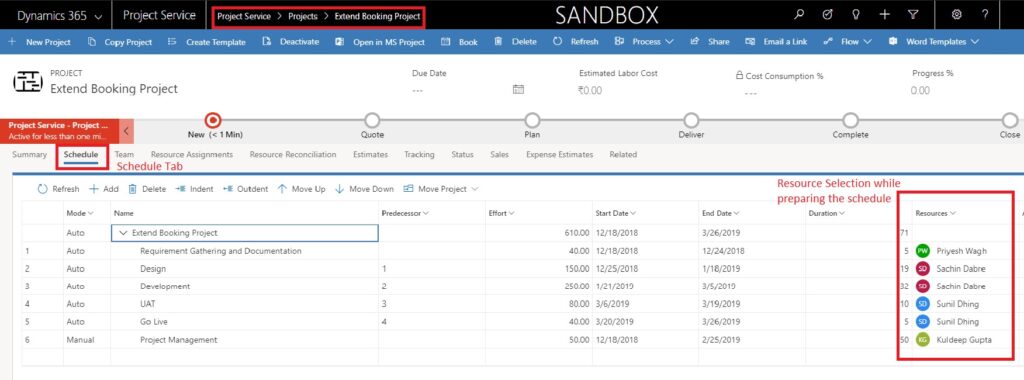
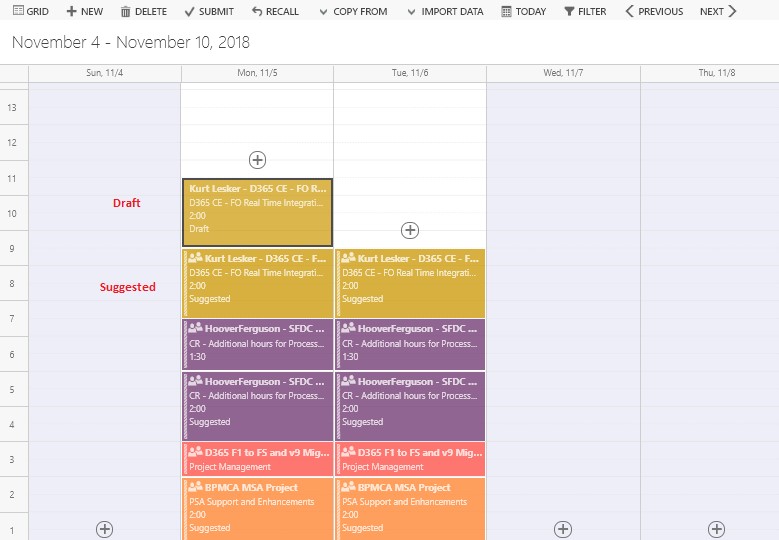
Extend booking functionality and an alternate to resource booking in PSA V3 I came across the functionality of Extend Bookings when I was moving ahead to allocate some hours to the resources on the project in PSA V3. This beautiful way makes the allocation so easy and just in a few clicks. This is only feasible when the Schedule is filled with some resources and not any generic resources. Below is how to use the Extend Booking Functionality: After the contract is created and confirmed, being a project manager I prefer creating the project plan. For the same I got the Project Service –> Projects–> Open the project –> Schedule tab. Once this is done, we traverse to the Team tab to see that the Resources Selected are already added as the Team Member. You can change the role the resource from there. Next when we see in the Resource Assignments view. We see a beautiful view of the hours when the resources will be probably needed to allocate. This doesn’t mean that the resources are hard booked. Next is the Resource Reconciliation view where we perform the Extend Booking functionality. As the legends read, yellow is Booking Shortage, meaning that the booking is not yet done. Once we make the booking via the Schedule Board or via Extend Booking functionality, the colour switches to Blue, which means that the booking is done. Let’s pick up a resource to do the booking. In our case I will make the booking for my resource. In the above screen shot, we see the Resource Reconciliation in weeks view. For Kuldeep Gupta, 50 hours of task was spread across a duration of 50 days while preparing the schedule. Hence, it spreads 1 hours each day in the week for 50 days. An important point to note here is that, Resource Reconciliation view splits the hours based on Front Load mechanism and uses the Work Hour Template on the project to decide the working hours a day and working hours in the calendar year. In our case, it is 8 hours working a day. I will now try to make the booking for Kuldeep Gupta for the week of 23rd Dec and 30th Dec. For doing so select the 2 weeks as shown in the screen shot below: As soon as we select these 2 weeks, Extend Booking button gets activated. Click on the Extend Booking Button, that opens up a pop up. If you observe the pop up gives the information of Booking Extension, that the booking needed to be done and Current bookings, which are hours for which the resource is already having the bookings in the system. We click on OK then to confirm the bookings. Below is what we observe. Post this we move back to Team Tab to check if the booking is done or not. We observe that now we have 10 hours of Hard booking for Kuldeep Gupta in place. I tried even further to validate these booking on the schedule board and to my surprise my thought was validated with the sight of the booking. Below is the screenshot of the booking. Above blog is merely my personal opinion and findings about the product.
[PSA Web series: Part 1] Sales Cycle in PSA V3
[PSA Web series: Part 1] Sales Cycle: Check out this informative video to know the process of lead to contract in hashtag#PSA V3. hashtag#ProjectServiceAutomation hashtag#MSDyn365 Shortly coming up with next part by this week. https://www.youtube.com/watch?v=7pnxdQ1Atbk&feature=youtu.be
Error: Value cannot be null. Parameter name: You must select a price list before saving
You must have often seen this error while qualifying the lead in PSA. This will only come when the lead is of the Type “Work Based”. There is an important parameter setting that is missing to be done in order to get to the resolution of this error. For the same we will go to Project Serviceà Parameters as shown in the screen shot below. Click on the default organisation unit. In my case CloudFronts Mumbai. Click on Price List tab and then click on Add New Project Parameter Price List button on the grid as shown below. A pop-up opens that asks for the price list. Select the price list and save. Now, when you create your lead with Type “Work Based”, and you qualify it, the error will not come.
Actuals vs Estimated hours myth
All these years I was calculating Actuals as the billable hours on the project with chargeable role. While PSA helped me cleared the myth. Below is how PSA helped me clear that myth and this is how I cleared my understanding towards Actuals vs Estimated in PSA. On the Project when I saw the project was estimated to be a short project of 22 hours and the Actuals were of 24 hours. I decided to dig deep into it to understand the issue of these 2 additional hours, as this was not a big project and getting the additional 2 hours mistake would be very easy. Below is what I did. I opened the Actuals from Project–> Project Name–> Actuals, as shown in the screen shot below. Then in the grid I sorted the “cost” aspect and calculated the No of hours which turned out to be 24. This was strange for me. Then I looked at the “Resource Role” column in the grid and found a 2 hour entry under the Non-Billable role. I pondered to think why is this 2 hours Non-Billable hours getting summed up in the actuals. But, if thought correctly, Even the Non-Billable hours spent by the Resource is an Actual cost to the company. This is how my myth got cleared and for my project budget calculations I got another field created on the form named billable hours and calculated the sum of all the chargeable roles hours in that field. This actually now gave me all the 3, Actuals, Estimated and billed hours in one go.
PSA Tip for doing correct time entries
Often, I find my team members doing mistakes at the end of the week while doing time entries for the week. I being so strict about resource allocation of each one of them also did not solve my purpose 100%. But, doing the allocations absolutely perfect made my simple though with the solution I followed. PSA has a feature in the Time Entries screen to import the “Resource Bookings”. I jumped out of happiness by looking at this feature. This not only made my billing procedure simple but faster though. Following is what I told my team members to do to achieve the same. Open the Time Entries screen. And click on Import Button. Select option Resource Bookings Option as shown below. Time Entries then gets fetched from the Resource allocation done in the schedule board. Below is how the screen looks. We then open each time entry by double clicking on it and add the comments. Upon saving the time entries status changes from suggested to Draft and there is one more entry that shows up on the Time Entry screen, which is solid in color and not faded. Below is how it looks. Likewise, when all the time entries are done, we should refresh the page and then the suggested time entries are gone only the Draft time entries remain. You can then submit the Draft Time entries and follow the normal approval process of the time entries. This reduces the errors in the time entries that the team does.